

In the menu item “Users” you will find all active contacts listed by default, which have contacted you so far.
What information you can find here:
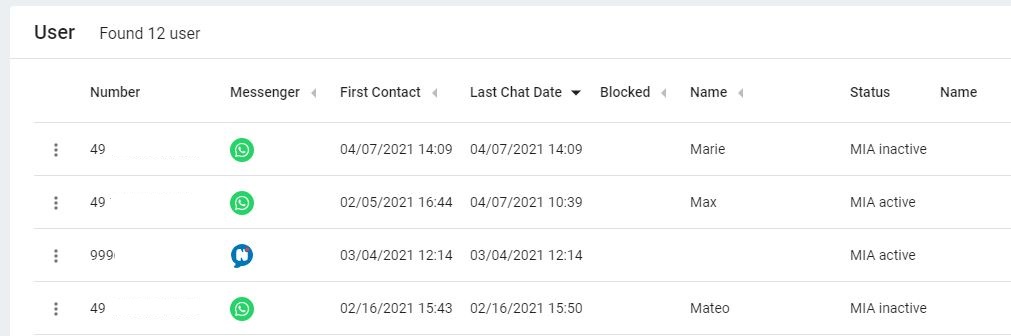
- Number of the user:in, the messenger used, time of the first contact, the last chat, whether it is blocked, his/her name and status of the user:in (MIA active/inactive). Some of these details can be sorted in ascending or descending order by clicking on the respective column.
- With the magnifying glass in the upper right area you can search for specific users. In addition, administrators can use the two arrows in the upper right corner to (import or) export all users, including the data displayed here, in CSV format.
- To display a list of inactive users, click on the icon in the upper right corner of the magnifying glass and filter by status “MIA inactive”. Here you can also sort by the different target groups you have defined in the target group configurator.
- Clicking on the three vertical dots opens a drop-down menu. Besides CSV upload and download, you can also change the settings of the table here. Here you can change the order of the columns, edit or delete them. You can also display previously created user characteristics as columns.
- With the help of the three dots to the left of the number, you can display the last ticket, block, deactivate or completely delete the user.
Can I upload existing customers to the tool?
If you already have the consent of these users to reach them through a messenger, then you need to follow these steps:
- Go to the three vertical dots on the top right.
- Go to CSV Download and download the existing users.
- Add the users to be added in the Excel table with the respective data.
- Save the CSV and then upload it again using the three vertical dots at the top right.
If you want to set a larger number of clients active for MIA, you need to do the following:
- Go to the icon to the right of the magnifying glass and filter by status “MIA inactive”.
- Download this target group via the CSV download.
- Delete all columns except the phone number and the messenger.
- Add a column “Activated” and enter a “1” here.
- Upload the CSV again.